Entering the information into RootsMagic 7
First, you need RootsMagic 7 or the free RootsMagic 7 Essentials. If you are taking a serious approach, get the paid version, which has real advantages, if you can afford it.
Open a new database in RootsMagic for the ancestral town. One approach is to trace your own lines, but if your ancestral town is small and the records do not have indices, you may be better off crunching all the records and finding the lines that cross with yours. It is always refreshing to find a marriage record connecting your ancestors to their siblings and multiple generations decsending from those siblings.
If you already have been recording information into genealogy software, export the data into a GEDCOM file. Select only the relevant lines, not your other branches, and be sure to select settings for privacy of living persons. I include living persons but suppress all facts about them except their names.
After importing the GEDCOM into a new RootsMagic database, you are ready to start reading and entering Italian records.

Above: A screenshot of RootsMagic 7. In the window to the left, you can scroll up or down to find the desired person, or simply start typing the surname, a comma, and the given name. Be careful, as RootsMagic will ignore any letter if there is no name with that letter at that point.

You can select the options to show alternate names, birth year and record number. Showing the record number will help you, especially after your database gets bigger.
Always attach sources to every person or fact. This will be very helpful when you find conflicting records. Did the other record really say that, or did you misread it?

The image above is a marriage record from Castelluccia, in Principato Citeriore, which is now Castelcivita, in Salerno.
As described in Harvesting, write the details on a sheet of scrap paper.

Now you are ready to go to the next page of the record:

Continue by filling in the dates from the second page:

Now you are ready to search your RootsMagic database to see if any of these persons are already there. Do not match on one name alone. When you see a couple with matching names and the dates look okay, write in their ID numbers on scrap paper. Using a red pen makes the scrap paper more readable.

Since both the groom and bride match, and this couple had children during the time period after the marriage (and maybe before, but the birth years are approximations) we can figure these are the groom and bride. Likewise with the parents of the groom and the parents of the bride.

I prefer to add the marriage first, because it is a marriage record that is the source. Here is the groom’s edit screen:

Shortcut: After you enter the given names and the surname, Alt+L skips past Prefix, Suffix and Nickname and unchecks the Living box, saving you keystrokes.
You don’t need to use the mouse much to add the marriage. On a Windows system, use Alt+A to open the Add a Fact screen.

You don’t need to scroll down. Simply type M and it automatically scrolls down to the first entry starting with M, which is Marriage.

Again, you don’t need to click the mouse. Simply hit Enter and it automatically opens the Marriage screen.

Here it asks you to select which bride, this one or a new one. Simply hit Enter.

The marriage edit screen is shown above.
 |
Left: You can save keystrokes and work more efficiently by omitting the shift and spaces when entering the date, as RootsMagic fixes it. Right: The date after being fixed by RootsMagic. |
 |

Only type in enough letters to make the correct town show, then hit Tab.
 At this point, it is quicker to hit the arrow-down key twice than to type in the name of the church. Then hit Tab.

The marriage is proven by a primary record, but you don't need to move your mouse. Simply type P, then tab, then space.
 Now it is time to add the source. Type Alt+S.

Here, type Alt+A to add a new source.

The first one on the list is the most popular, Free Form, and that is what I use. Simply hit Enter.

Here I enter the source. Adding the URL is next.

The arrow points to the location window. Click on that to turn it blue. You may need to click on the page and outside the enlarged image first.

You did it! Wow, you’re so smart! You turned the URL blue! Now press and release Alt, then type E and C to copy the URL into your clipboard.
At this screen, type Shift+Ins to insert the URL.

Add the date you accessed that internet resource. I switch to the next day’s date at midnight, Co-Ordinated Universal Time so I can be superior to the ignorant masses, and you can, too.

With your mouse, highlight the entire source, then copy iy to the clipboard with Ctrl+C. Tab down to the next window and enter the source with Shift+Ins.

For the short footnote, highlight the URL and the text following it. That is, click just after the end of the text, and, while holding the Shift key down, hit the Up-Arrow key thrice, then hit the home key. Now release the Shift key, and hit Backspace. This deletes the stuff you don’t want in a short footnote.

What’s wrong with this picture? Over on the right, the period ending the Short Footnote is on the next line. Hit the backspace again. Type Alt+O to save the source.
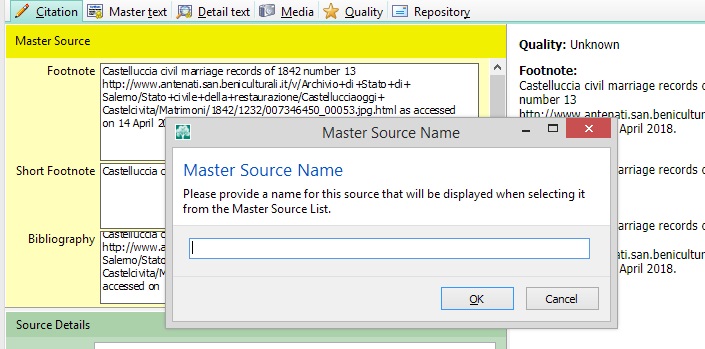
Here, type in a name for the source. Since it is Castelluccia marriage of 1842 number 13, I use CM1842-13 as a source.

After typing in the source name, type Tab, Enter.

Since you will need to add the source to other facts, type Alt+M to memorize it. As you enter more facts, type Alt+S to open the source box, then Alt+P to add the source, then Alt+O to close the source box. Simply hold down the Alt key and type SPO, then release the Alt key.

This is the edit screen for the groom. Before adding a birth fact, make sure you are on the correct person, lest you add the bride’s birth date as the groom’s or vice-versa. That will cost you time in fixing. To add the birth fact, type Alt+A to Add a fact.

To add the birth, if you type B it brings up the first fact that starts with B, which is Baptism. So, to bring up Birth, you need to type Bi, which brings up the first fact starting with Bi, which is Birth.

Now hit Enter to bring up the Birth edit screen.

Entering the birth information is much the same as entering the marriage information.

The marriage record gives the groom’s date and place of birth, but it is not proof and is not a primary record for the birth. Enter the information and then Alt+V to save it. Then Alt+S to bring up the source box.

Since the marriage record was memorized as a source, simply type Alt+P to paste to the birth a citation to the marriage source.
As you enter information, you fill find conflicting sources. One common way this happens is when the bureaucrat used the date the birth or death was recorded as the date of the event itself. You might find the extract itself in the processetti which are files where these documents are stored. If you find a birth extract and work from that, you can consider it proof. I don’t consider it primary, as I would consider the actual record. The dates of events, however, make it easier to find the actual records.

Now to add the parents. This is why it is good to have their ID numbers written in red on your scrap paper. Type Alt+S, P, Alt+R to bring up the search-by-number box.

In the search-by-number box, type in 8511 and Enter.

Make sure it is the correct person. Then hit Enter to bring up that person.

These are the parents of the groom, as shown on the marriage record. To add the groom as their child, type Alt+A, C to bring up the Add Child box.

Since the correct parents are already highlit, and you know the ID number, type S.

Since you have the ID number, type Alt+R to select an existing person. Typing Alt+R brings up that box.

Now type the groom’s ID number, 1490 and Enter.

Make sure it is the correct person and then hit Enter.

Now the groom has been attached to his parents. Since you won’t be adding any more people to these parents at this time, type Tab and N.

This dialog box allows you to rearrange the children if necessary, but in this case it is not necessary.

Now you have connected the groom to his parents. Connect the bride to her parents the same way, and don't forget to add the bride’s paternal grandfather. Also add previous spouses, when they are shown. When adding people with a date of death, add the death fact. If it is already there, add the marriage as another source of the death. If there is already a death shown, with a different date, add a new death with the date you found on the marriage record, as a new death fact, and be sure to attach the source.
Do not include anything in a data field that isn’t the thing that belongs there. Do not add a question mark, or words like probably as all such stuff belongs in a note attached to the fact.
There is considerable discussion and debate about place names in genealogy documents. There may be judgment calls. In most cases, with these records, the place is Casa comunale, a church, or home. If you cannot be sure due to handwriting issues, write what you think it is and then add a note. Do not include the cause of death in the date or place field.
Since FamilySearch does not yet accept the former names of Italian comuni, only you can decide whether to use the accepted standardized place name or the proper name in vogue when the event happened. However, don’t try to jam both into the place field. Mention the other one in a note.
When searching the list of persons, and going down the ones named Maria Tancredi, looking for the one whose huband is Paolo Scaramella, remember to watch the number of husbands, just above the woman’s name. She might be the Maria Tancredi who did marry Paolo Scaramella, but her other husband may be displayed. Likewise when searching for the Paolo Scaramella whose wife is Maria Tancredi, look for the number of spouses.
Color-coding the names
This feature is available in the registered version of RootsMagic 7. I started with myself and coded myself and all of my ancestors blue. Then I went to the beginning of each blue ancestral line and coded everybody and their descendants red. Then I went back and coded myself and my ancestors blue, as these names had been turned red. My major ancestral surnames in Castelcivita are Poto and Tancredi, so when a line with either name goes back to somebody who had children in the seventeenth century, and does not connect to my ancestral lines, I code the Poto or Tancredi names purple, so I can quickly see that they have already been traced back with little hope of discovering a connection any time soon.
In Castelcivita, Rosario Cantalupo married Rosaria Gigliello in 1873. Then in 1892 another Rosario Cantalupo married another Rosaria Gligliello. I coded all four names green to alert myself before adding a child to either family.
You may choose these color-coding conventions or your own.